Split color lighting is a powerful and dramatic lighting technique that photographers and videographers alike use to create striking, high-contrast images. Whether you’re capturing a portrait, a product, or a scene, this style of lighting can elevate your photos to new levels of visual impact. In this article, we will dive deep into what split color lighting is, how it works, the equipment you need, and tips for mastering this technique. By the end of this guide, you’ll understand exactly how to harness the potential of split color lighting to produce stunning, cinematic images.
What is Split Color Lighting?
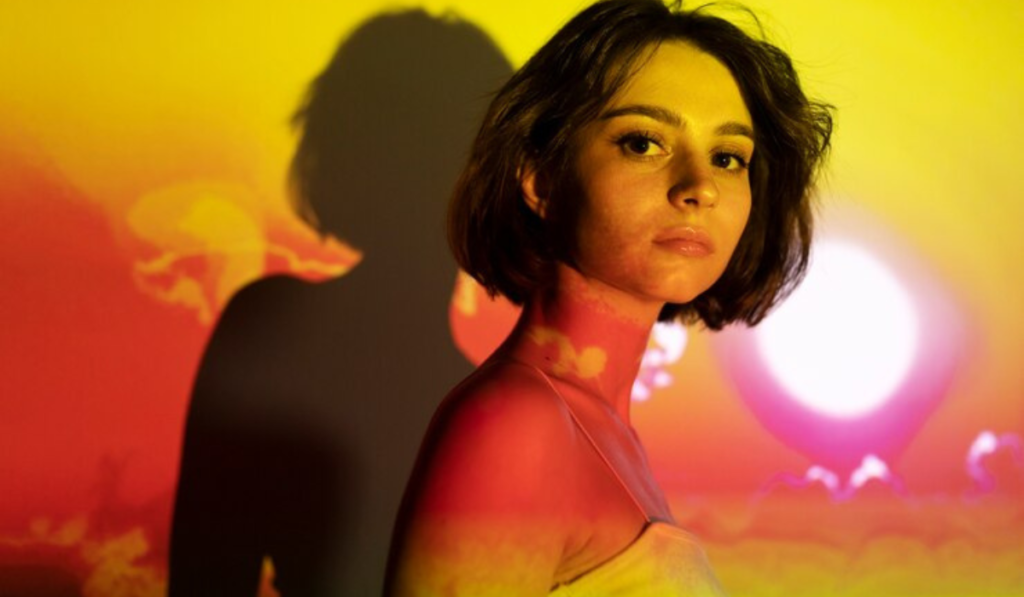
Split color lighting refers to a lighting technique that divides a subject’s face, object, or scene into two contrasting areas: one brightly lit and the other cast in shadow. Typically, this effect is achieved by positioning a light source at a 90-degree angle to the subject, creating a hard line of division between the light and shadowed halves. This style has been a staple in portrait photography, fashion shoots, and even cinematography for decades due to its ability to evoke strong emotions and emphasize the subject’s features dramatically.
The defining feature of split lighting is its ability to highlight one side of the subject while leaving the other side in deep shadow. The result is a visually compelling image with high contrast, often used to convey mystery, drama, or tension. It’s a technique that demands precision and control but offers immense rewards in terms of visual storytelling.
The Visual Effect of Split Color Lighting
The split lighting effect is known for its sharp contrast and striking impact. This technique works especially well in black-and-white photography, where the shadows and highlights create a timeless and high-drama mood. By illuminating only half of the subject, split color lighting focuses attention on the features of the subject’s face or form, creating depth and dimension.
Creating a Cinematic Mood
Split color lighting is highly effective in creating a cinematic or noir-style mood. This lighting arrangement is frequently seen in film and television to evoke a sense of mystery, conflict, or psychological tension. It’s especially popular in portrait photography, where the emphasis on the subject’s eyes or facial features can convey a sense of intrigue, vulnerability, or power.
For photographers, the key to utilizing split color lighting is mastering the balance between light and shadow, ensuring that the illuminated side of the subject is sufficiently detailed while the shadowed side remains dark enough to provide contrast without losing too much detail.
How to Achieve Split Color Lighting
Achieving the perfect split color lighting setup doesn’t require an excessive amount of gear, but it does necessitate careful planning and technique. Here’s a step-by-step guide to help you master this lighting effect:
Step 1: Positioning the Light Source
To create split lighting, position your light source at a 90-degree angle to the subject. The light should be at the same level as the subject’s face or object, ensuring that it illuminates only one half. The light should be placed perpendicular to the subject, either on the left or right side, to create the stark division between light and shadow.
Step 2: Adjusting the Distance
Adjust the distance between the light source and the subject. The closer the light is to the subject, the sharper and more defined the shadow will be. Conversely, placing the light further away will soften the shadow, reducing the contrast between the lit and shadowed areas.
Step 3: Fine-Tuning the Exposure
Take a test shot and assess the exposure levels. You may need to adjust the aperture, shutter speed, and ISO settings on your camera to ensure the contrast between the light and shadow is pronounced but not overly harsh. Pay attention to the areas in shadow to make sure you’re not losing too much detail in those regions.
Step 4: Experiment with Backgrounds
The background can significantly affect the overall impact of split color lighting. A dark, neutral background will allow the lighting effect to shine, whereas a bright or busy background may detract from the dramatic impact. Choose a background that complements the mood you’re aiming to create with the lighting.
Essential Equipment for Split Lighting
While split color lighting can be achieved with a minimal setup, having the right equipment is crucial to achieving precise results. Below are the key tools you’ll need for effective split lighting:
1. Key Light
The primary light source used in split lighting is the key light. This light will illuminate the subject from one side, creating the stark contrast that defines the effect. A softbox or an umbrella light can be used to soften the light if desired, but for the most dramatic effect, a hard light is preferred.
2. Reflector or V-Flat
To balance out the harsh shadows on the opposite side of the subject, you may need a reflector or a V-flat. A reflector can bounce light back onto the shadowed side, allowing some details to emerge without losing the overall contrast. A V-flat is a versatile tool that can be used for both reflecting light and blocking it, depending on your needs.
3. Camera and Lens
Any DSLR or mirrorless camera with manual controls will work well for split color lighting. A lens with a wide aperture (such as a 50mm f/1.8 or an 85mm f/1.4) can help create a shallow depth of field, which is ideal for focusing on the subject while blurring out the background.
4. Light Modifiers
Depending on the look you’re going for, you may wish to use light modifiers such as gels or flags to alter the color temperature or intensity of the light. Using color gels can add a creative twist to the split lighting effect, enhancing the contrast with different hues.
When to Use Split Color Lighting
Split color lighting is perfect for a variety of photographic scenarios, but it’s particularly effective in the following cases:
1. Portrait Photography
Split lighting is a classic technique for portrait photography, especially when you want to convey strength, mystery, or a dramatic emotion. It’s commonly used in editorial, fashion, and Hollywood-style portraits to highlight the facial features and create a bold visual impact.
2. Product Photography
When photographing products, split color lighting can help emphasize the texture and shape of the object, creating a high-contrast, visually striking image. It is particularly useful for products with intricate details that you want to highlight.
3. Cinematic and Storytelling Photography
In filmmaking or storytelling photography, split lighting is used to evoke emotion and build tension. It’s often used in character portraits, action shots, and scenes that require an air of suspense or conflict.
4. Moody or Black-and-White Photography
This technique is ideal for creating dramatic effects in black-and-white photography, where the shadows and highlights play a more significant role in the overall composition.
Tips for Perfecting Split Lighting
To truly master split color lighting and make it an effective tool in your photography, keep these tips in mind:
- Experiment with Angles: Slight adjustments in the angle of the light source can drastically change the mood of the image. Experiment with positioning the light slightly higher or lower to see how it affects the shadows.
- Use Hard Light for Drama: To achieve the sharpest contrast, use a hard light source, such as a bare bulb or a focused spotlight. This will create a defined line between the lit and shadowed areas.
- Embrace Shadows: Don’t be afraid to embrace deep shadows in your images. The contrast between light and dark is what makes split lighting so visually powerful.
- Mind the Background: Keep the background simple and dark to avoid distracting from the dramatic effect of the split lighting.
Conclusion
Split color lighting is a remarkable technique that can transform your photography by adding contrast, depth, and mood. Whether you’re photographing portraits, products, or creating cinematic shots, mastering this technique will allow you to craft powerful, visually captivating images that demand attention. With the right equipment, practice, and an eye for detail, you’ll be able to create stunning photos that stand out and evoke a strong emotional response from viewers.