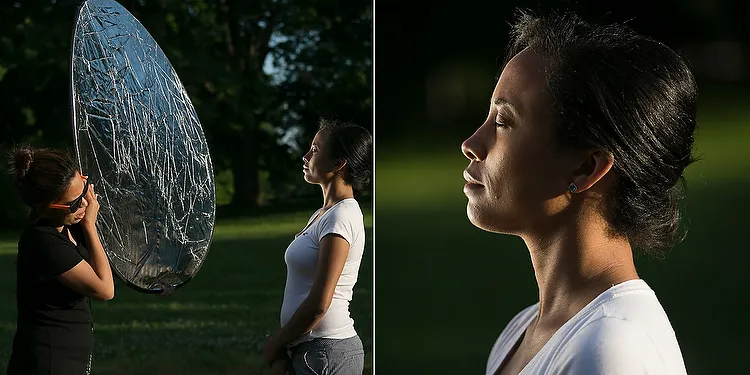
Photography reflectors are an essential tool for photographers and videographers looking to achieve professional-quality lighting in their work. Whether you’re capturing portraits, product shots, or cinematic videos, understanding how to effectively use reflectors can elevate your results. In this guide, we will delve into every aspect of photography reflectors, from their types and applications to advanced techniques for maximizing their impact.
Why Reflectors Are Essential in Photography
Reflectors are versatile tools used to manipulate light in a controlled manner. They help fill shadows, create highlights, and add dimension to subjects. Below, we explore some of the key benefits of incorporating reflectors into your photography workflow:
- Eliminating Harsh Shadows: Reflectors soften harsh shadows, especially in outdoor settings with intense sunlight.
- Enhancing Hair Lighting: By bouncing light onto hair, reflectors add a polished and professional touch to portraits.
- Balancing Backlighting: In situations where the subject is backlit, reflectors provide fill light to even out the exposure.
Types of Photography Reflectors
Reflectors come in various shapes, sizes, and colors, each suited for specific scenarios. Choosing the right reflector depends on your creative vision and the environment you’re working in.
1. Sizes
Reflectors range from small, portable options (around 20 inches) to large ones (up to 50 inches or more). Smaller reflectors are ideal for close-up work, while larger reflectors are better for full-body portraits or group shots.
- Small Reflectors: Best for tabletop photography or detailed portraits.
- Large Reflectors: Suitable for wide scenes and outdoor shoots.
2. Shapes
Reflectors are available in various shapes, such as circular, rectangular, and hexagonal.
- Circular Reflectors: Compact and commonly used for their ease of handling.
- Hexagonal Reflectors: Provide broader coverage and are favored in studio setups.
3. Colors
Reflector colors influence the quality and tone of reflected light.
- Silver: Produces bright, cool-toned light, perfect for enhancing details.
- Gold: Adds warmth and mimics the effect of golden hour lighting.
- White: Softens light without altering its color temperature.
- Black: Absorbs light and creates dramatic shadows.
Advanced Techniques for Using Reflectors
1. Combining Reflectors with Key Lights
Pairing reflectors with a primary light source enhances the overall lighting setup. Position the reflector opposite the key light to bounce light back onto the subject, reducing harsh shadows and creating a balanced look.
2. Using Reflectors with Natural and Artificial Light
Reflectors work seamlessly with both natural and artificial light sources. Outdoors, use reflectors to redirect sunlight onto your subject. In studio settings, they complement artificial lights to achieve the desired lighting effect.
3. Creative Shadow Control with Black Reflectors
Black reflectors are not reflective but are used to absorb light and enhance shadows. They are particularly useful for creating moody, dramatic portraits or adding depth to product photography.
4. Blocking Light with Reflectors
The white side of a reflector can be used to block excessive light, reducing glare and ensuring a softer overall illumination. This is especially helpful in harsh sunlight.
5. Fill Lighting with Reflectors
When working in low-light environments, reflectors can serve as a secondary light source by bouncing available light onto the subject. Larger reflectors provide a broader fill, making them suitable for dimly lit settings.
6. Finding the Perfect Reflective Angle
Positioning the reflector correctly is crucial. Rotate and tilt it until the desired amount of light is directed onto your subject. Using a mirrorless camera or live view mode can help visualize the changes in real-time.
7. Adjusting Reflector Distance
The distance between the reflector and your subject determines the intensity of the reflected light. Move the reflector closer for stronger illumination and farther for softer light.
Practical Applications of Reflectors
Portrait Photography
Use a silver or white reflector to brighten facial features and reduce shadows under the eyes. For outdoor portraits, a gold reflector can add warmth to skin tones.
Product Photography
Place a reflector beneath or beside small objects to minimize harsh shadows and highlight details. A white or silver reflector works best for clean, professional results.
Video Shoots
In videography, reflectors help maintain consistent lighting across scenes. Use them to fill shadows or highlight specific areas of the frame.
Tips for Getting the Most Out of Reflectors
- Invest in a Reflector Kit: A kit with multiple sizes and colors provides flexibility for different scenarios.
- Use a Stand for Stability: Reflector stands free up your hands and allow for precise positioning.
- Experiment with Angles: Try different angles to understand how light interacts with your subject.
- Practice Outdoors: Natural light is an excellent starting point for mastering reflector techniques.
Conclusion
Mastering the use of photography reflectors is a game-changer for professionals and enthusiasts alike. With the right techniques and a creative approach, reflectors can transform your photography, adding depth, dimension, and a polished finish to your work. Start experimenting with various types and applications to discover the endless possibilities they offer.